Pages

Tuesday, November 19, 2013

Moving from svn to git :Step 1:Setting up Git on Windows, with TortoiseGit as UI


So, my department is planning on moving from svn to git for version management and we have been instructed to research git and see how it works for us. Spent the day installing Git on my personal laptop and playing with it. Here is my "Git novice" attempt at blogging about my experience.

Btw, I am installing Git on my Windows 8 laptop,

Installing Git

This could not get easier. All I had to do was to follow the steps given in the Git Getting Started Guide
Since I was using windows, I followed the guidebook instructions for windows. Steps were:
- Go https://msysgit.github.com and click on Downloads.
- I downloaded the latest version Git-1.8.4-preview20130916.exe

Ran the exe and the wizard walked me through the process, I left all the default selections intact and Voila!!!, I had git installed.


Here is what the sneaky installer had created the a folder called Git under program files,
here are the contents of the folder
Clicking on Git Bash opened up the Git Bash shell.

Now that I had Git on my laptop, I needed a repository I could work against. I probably could have used one of the gazillion repositories on GitHub, however I decided to create my own.

I signed up on GitHub and created a repository.

I started the git bash and  followed some of the steps mentioned in the First Time Setup chapter of the "Getting Started" guide. I setup the username and email to match the values in my GitHub account, just wanted to keep things simple for my first attempt.

I skipped the rest of the configuration mentioned in the guide.

Cloning the repository

For starters I decided to clone the repository mentioned in the Git Start Up guide

I brought  up the git bash, changed folders to C:\\work and ran

git clone git://github.com/schacon/grit.git

Within a blink of an eye a folder called grit was created under C:\\work
Here is how the git bash looked


And this is how the newly created directory looked:

So what just happened?

Apparently, .git has all the data for the repository pulled down, so that is now my local repository while the working copy is in the grit directory, all ready to roll.

Yay!!! That was simple. Now I was so eager to clone my very own repository. 

So followed the same pattern ie"
git clone git://github.com/<MyGitUserName>/<MyRepositoryName>

Ex: git://github.com/gsmsengupta/mysandbox

Before I knew the repository was downloaded and git was nice enough to let me know that the repository was empty. It was indeed empty. I needed to ato add something.

Adding and Commit files


I created a new file under C:\work\mysandbox and called it SandyBeach.txt

executing git status warned me of the un tracked file:

Next step adding the file to tracked status:

git add SandyBeach.txt

On running git status again, git let me know that a new tracked file has been added and that file has not been commited.

So I ran git commit.
As I had not set up my preferred editor in the 'Git Config' step, running git commit opened a VIM session, I entered some comments and saved the VIM. That completed the commit as shown below.


Push changes to remote repository


I wasn't done yet. I needed to push the changes to the remote repository that I had created on Git Hub.

Here is where I encountered my first road block.
As per the guide, I executed the following command:

git push origin master

However got presented with the following:

fatal: remote error:
  You can't push to git://github.com/gourijamenon/mysandbox.git
  Use https://github.com/gourijamenon/mysandbox.git

Here is a screen shot of the same:
What just happened here???
Did some research on the net and found out that github does not support push over git:// protocol.
So I had to use https as suggested.

The revised command was:

git push  https://github.com/gourijamenon/mysandbox.git

This now asked me for my GitHub username and password, and yay!!!! Pushed the file.


Though I had created a pretty useless text file, I could not be more proud. I had just commited it using git bash.

Installing TortoiseGit

Enough of bash commands, I was so ready for some UI click actions. I am pretty comfortable with TortoiseSVN so naturally gravitated towards TortoiseGit.

This again was very straightforward, visit site TortoiseGit download and install, piece of cake.
I was prompted to restart the laptop which I did. After restart, all my git repos now had the familiar green check and right clicking started giving me the TortoiseGit options. Check out the TortoiseGit website for details.

I added a few new files, right clicking prompted me to add. I could commit the files to the local repository. No problems till now.

I was ready to claim victory when I realized that I had not pushed the changes to GitHub.

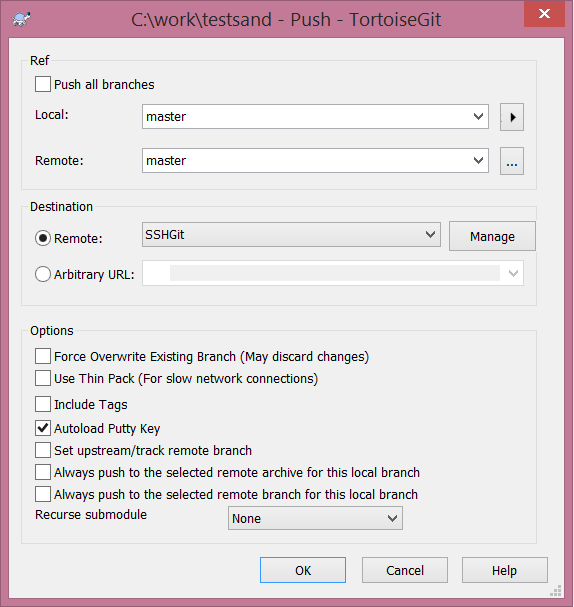
So I right clicked and selected Push, here is what I saw:


I clicked OK and got the now familiar  You can't push to git:// use Https:// error


No problem I thought, I know exactly what to do, I need to change to Https protocol.

So I click on the Push, and click the manage button on the resulting screen:

That gave me an option to add the Https Option:

Ohhh...it requires a putty key, now where do I get that. Went back to research mode and came across two very helpful articles:
https://help.github.com/articles/generating-ssh-keys shows how to generate the ssh keys and add it to the repository.
http://olelynge.blogspot.com/2012/04/tortoisegit-and-ssh-keys.html gives step by step instructions on how to get tortoiseGit to use the key to  enable ssl.

So now that I had the Https thingie configured I selected that from remote destination dropdown and proudly clicked okay and guess what....TortoiseGit does not support Https, here is the screen shot of the spectacular crash and burn


Now what??? Dead End??? Not yet.... there is one more protocol I could try. SSH.

Went back to Manage Remote Destination and configured SSH.

URL was sshified as git@github.com:gourijamenon/mysandbox.git
I believe the for ssh access of github the URl pattern is:
git@github.com:<gitusername>/<yourgitrepo>


Here is a screen shot:


Went back, right click-->Push-->Selected remote destination configured to use SSH protocol.


Clicking on Okay prompted me for the key paraphrase:


After I entered the paraphrase...oh the sweet joy ........the changes were pushed to the remote repo.


Wednesday, November 6, 2013

Maven 101: Day 3 :Compile, Test, Package and Install

 
Goto Prev: Understanding POM


Maven loves its directory structure..:)


Maven is all about standardization, it has a default directory structure and the dudes and dudettes at Maven do insist that we stick with the default/recommended directory structure as much as possible.
Now they have provided a way for us to override it using the project descriptor see Apache Maven Tutorial : Directory structure explanation. I am not even considering going down that route. I am happy with the default and recommended structure.

I plan to go back to inspecting the directory structure after each step ie, compile, test and package.


Compile

Finally time to run mvn compile.

Here is how the project looks before I hit mvn compile.


So the structure is 

/namaste/src
/namaste/src/main
/namaste/src/main/java
/namaste/src/test
/namaster/src/test/java

namaste: The project folder
src: This folder contains all the material required for building the project
main: This folder contains the material for the main build artifact
test: This folder contains the material for unit tests
java: You will find this folder under both main and test. Under the java folder we see the package structure. This is the folder where you will place your java files.

/main/java/com/gsm/app contains the class App.java.

This is how App. java looks.


/test/java/com/gsm/app contains the test class AppTest.java. This class implements the JUnit test for App.java.
Here is the screen shot for AppTest.java

Next step mvn compile. 

Now that I have a fully compiled maven project let me inspect the directory structure.


So compiling the project has added the folder target. This folder is a peer to src and created under namaste.

So the location of the folders created after compile is:

/namaste/target
/namaste/target/classes

Under the classes folder we see the project structure and the java class, App.class.

target: This directory holds all the output of the build

Test

Next step, mvn test. This runs the maven test and two new directories get created.

The test classes get compiled and placed under /namaste/target/test-classes.
A test report is created and placed under /namaste/target/surefire-reports.

Package

Next I ran mvn package.
This resulted in the creation of the jar and the maven-archiver folder.
Both these artifacts were created under the /namaste/target folder
Here is a screen shot of the target folder after I ran mvn package.


Under the maven-archiver folder, I spotted a pom.properties file, I am yet to figure out what do with it. Maybe someday I will be mavenlightened enough to know the answer to that, for now moving on.

Install

Ran mvn install and that copied the files to ./m2/repository. It created the following folder structure under ./m2/repository.
/com/gsm/app/namaste/1.0-SNAPSHOT
The 1.0-SNAPSHOT folder contained the following files.


Question: What is a Maven Repository?
 Detailed answer to this question can be found at :Intro to Maven Repos.
However, here is the summary:
There are two types of repositories remote and local. Remote: These are hosted repositories that contain artifacts that need to be shared among various developers. Maven's central repositories are remote repositories that contains the common maven artifacts. Local: which is a copy of your installation, usually lives on your local box and contains artifacts that you downloaded from the remote repositories and the artifacts created by your build effort.

Most corporates have an internal hosted remote repository, this repository has artifacts downloaded from the Maven Central repositories and   artifacts released by the the internal team.
A repo manager is usually used to host such a repository ex. Sonatype Nexus


 Phew !!!! So ready to call it a day.

Tuesday, November 5, 2013

Maven 101: Day 2: Understanding POM

Goto Prev: Day 1: Install and Setup                          Goto : Next: Compile, Test, Pckg,Inst


This is Day 2 of my maven journey. On Day 1, I setup maven on my laptop and created a maven project.
I also tried to understand the basics of the command that I used to create the maven project.

Today I plan to understand the basics of POM.

I am going back to my trusted Apache Maven Tutorial as a guide.

Introduction to POM- Project Object Model

This is an XML file that contains the project and configuration details required by Maven to build the project. You can specify project dependencies, plugins that would be used and information like version, description etc. When we execute a maven goal, Maven looks for the POM in the current directory, it reads the POM to get all required information to execute the goal.


Maven has a default POM, this POM is called the Super POM, all POMs extend the super POM unless explicitly set. The Super POM has meaningful default configurations and these configurations are inherited by the POMs created in a project. Here is a snippet from the Maven 2.1.x super POM, this snippets show the Super POM contains default values for some common directories:

 <directory>${project.basedir}/target</directory>
    <outputDirectory>${project.build.directory}/classes</outputDirectory>
    <finalName>${project.artifactId}-${project.version}</finalName>
    <testOutputDirectory>${project.build.directory}/test-classes</testOutputDirectory>
    <sourceDirectory>${project.basedir}/src/main/java</sourceDirectory>
 
 
One good thing about inheriting default is that you only have to specify a handful of things in your project's POM and rely on Super POM for the rest. The minimum required values for a project POM are as follows:
<project>
  <modelVersion>4.0.0</modelVersion>
  <groupId>com.gsm.app</groupId>
  <artifactId>namaste</artifactId>
  <version>1.0-SNAPSHOT</version>
</project>


project: This is the top level element of all pom.xml files
modelVersion : This is the version of the object model used by this POM. Not something I as a beginner would worry about. I plan to go with what ever the skeleton archetype gives me.
groupId : The unique identifier of the organization that created the project.
artifactId : The unique name of the primary artifact
version : The version of the artifact generated by the project.

This minimal pom does not require you to specify a packaging type, it uses the default value , which would be "jar".

For a project built with the above minimal POM the out put would be a jar file named as follows:
namaste-1.0-SNAPSHOT.jar

Since the above POM does not specify repositories it will download any required files (dependencies)
from the default maven repository http://repo.maven.apache.org/maven2.
It inherits this value from the Super POM.


Parent Project

Please don't quote me on my description of a Parent Project , but from what I gathered. Parent projects can be used at least in these two contexts:
 
Inheritance: If you have several Maven projects with similar configurations, you can pull the similar configurations our and make a parent project. You then specify this common project as the parent project for the rest of your Maven projects and the child projects would inherit all the parent project configurations.

Aggregation: If you have a group of projects that always need to be  built together, you can create a parent project and declare all the required projects as its modules. You then build only the parent project and the rest will get built automatically.

You can use either Inheritance or Aggregation or both as long as :
  • Every Child POM has a reference to its Parent POM
  • Parent Poms packaging is set set to "pom"
  • Parent POM has references to its child modules' directories


So if our project Namaste is now a parent project of project Smile. And the directory structure is:

  • Namaste
    • pom.xml
  • Smile
    • pom.xml
Here is how their pom.xml files would look.
Namaste:

*Using Aggregation, ie build Namaste and Smile builds along with it.
 
<project>
  <modelVersion>4.0.0</modelVersion>
  <groupId>com.gsm.app</groupId>
  <artifactId>Namaste</artifactId>
  <version>1</version>
  <packaging>pom</packaging>

  <modules>
    <module>../smile</module>
  </modules>
</project>
Smile:
 *Using Inheritance to inherit properties from Namaste

<project>
  <parent>
    <groupId>com.gsm.app</groupId>
    <artifactId>namaste</artifactId>
    <version>1</version>
    <relativePath>../parent/pom.xml</relativePath>
  </parent> 
 <modelVersion>4.0.0</modelVersion>
 <version>1</version> 
 <groupId>com.gsm.app</groupId>
 <artifactId>smile</artifactId>
 </project>
 
If we want to use the same version number or group ID as the parent, we have the option of leaving that out in the child pom. Thus the child pom will look something like this:

<project>
  <parent>
    <groupId>com.gsm.app</groupId>
    <artifactId>namaste</artifactId>
    <version>1</version>
    <relativePath>../parent/pom.xml</relativePath>
  </parent>
  <modelVersion>4.0.0</modelVersion>
  <artifactId>smile</artifactId>
</project>


POM Variables/Properties

You can use predefined or user defined variables, the idea is to specify the value for the variable once and reference it everywhere else.
Any  single valued element in the model can be referenced as a variable. So if you need to access the value of the  groupId you would access it as ${project.groupId}, sourcedirectory would be
${project.build.sourceDirectory}.

You also get ready made variables that you can be used, For ex.
${project.basedir} : gives you the current directory of the project

You can define properties and use them as a variable later in the pom.


 Important point to note is that the variables are processed after inheritance and thus child values will override parent values.


Goto Prev: Day 1: Install and Setup                             Goto : Next: Compile, Test, Package Install